

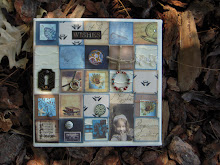
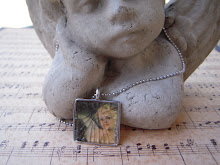
A lot of people are making altered dominoes, but as a mixed media and collage artist, I’ve been turning my dominoes into collages.
I use plastic dominoes and always decorate the back, never the side with the dots. Sometimes the idea for a collage would come from having a few cute dominoes left from another project, but now, I like to plan a theme (often Paris or Fairies) or color scheme, I love brown with green or brown with blue). Anything goes! Trust your instincts!
A few months ago my husband gave me a BIG box of 91 dominoes, so I could experiment to my little heart’s desire. I’ve used almost all of those to date, and I’m excited that I’ll be shopping for another big set of dominoes soon.
Okay let’s get right to it!
I’m not big on power tools (in fact while taking a wood class at ASU, I was asked to allow the TA to use the BIG machines for cutting my materials, a bit accident prone I guess, but not as bad as the young woman in the short shorts who spilled hot glue all the way down her leg!). So I don’t drill the dominoes to make bracelets or necklaces, there are plenty of metal findings to use if that is your goal or if you like power tools, go for it! Just be careful!
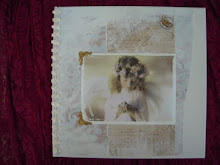
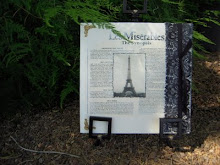
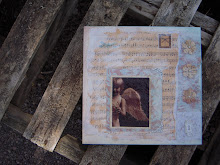
I start with an image, often ephemera or a piece of paper that I like and cut it to the approximate size of the domino. I used to cut round corners but found a short cut. Use a thin glue to attach the paper to the domino, let dry. Use an old emery board to round the corners! (That’s brilliant, yes?). One of my favorite domino collages is a sepia toned landscape of Paris with the Eiffel Tower in the image. If you have a photo or image you want to use, just make note of where the parts of the image lie so you can get them in order once you’re ready to glue. You can layer your papers but let the glue dry between images. With fairies I often add wings, giving the domino a little more interest and dimension. Don’t be afraid to overlap shapes.
Once dry, I use chalky inks around the edges. I prefer a vintage look, I don’t really want people to notice at first that it’s a domino. You can use one color or two (blue on the top, brown on the bottom for landscapes, etc. you get the idea).
Do this for several dominoes and things really begin to take shape!
I like to use Ranger: Rock Candy over a few dominoes (only takes a few minutes to dry) or colored Ranger: Stickles for outlining, accenting, etc. Sometimes it is those small details that are hardly noticeable that catches someone’s attention.
For the collage, it helps to see a few dominoes side by side, to see what colors and themes fit your end result. I don’t like to put all the dominoes in the same direction, I like a few ‘horizontal’ and a few ‘vertical’ in each area of the collage. However, for the Paris landscape, I did put all the dominoes in a row, and it worked.
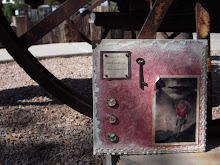
Once you have them laid out in order, you can begin adding metals, gems, coins, old stamps, flowers, beads, buttons, keys, old jewelry, metal corners, more inks, etc. Keep in mind, If you’re adding 3D embellishments, you need to make sure your dominoes still fit together tightly!
I don’t like to rush the background for the collage. I often use a frame (take out the glass) or a wooden ‘canvas’. I add paper, shimmer powers, metallic pens, a little stamping and/or embossing powders. The background is as important as the dominoes because it becomes a ‘frame’ to show off your hard work.
Once you’re done with the background, you can start gluing your dominoes together. This is FUN! Just like gluing popsicle sticks together (you all remember making boxes with popsicle sticks in grade school, right?). I glue the dominoes together by the sides first, and only two at a time, as the glue dries I’ll glue two to the section to make four, etc. I like Aleene’s Tacky Glue. It’s strong and trustworthy. It gets a little tricky the bigger your collage is, so be patient and try using a ruler or something sturdy to keep everything aligned. Once you have ALL your dominoes glued together, let them dry for at least an hour. Once they feel sturdy add plenty of glue to the back of your dominoes and set firmly in place, I often use a paper weight to keep things from moving around.
A few more embellishments to tie it all together and you’re done!
Feel free to ask questions or post pictures! ENJOY!


3 comments:
What a fabulous piece and thanks for the instructions x
I absolutely love this idea Judy! Your finished piece is beautiful. I must try this some day. I only have a bajillion dominoes laying around.
this is awesome thank you for directing me here...I will be definately trying this LOVE IT!!!
Post a Comment